Chapter Contents:
4.1 Tools for Design of Programs
4.2 Top-Down Stepwise Refinement
4.3 Top-Down Stepwise Refinement Examples
4.4 Questions
4.5 Exercises
4.2 Top-Down Stepwise Refinement
4.3 Top-Down Stepwise Refinement Examples
4.4 Questions
4.5 Exercises
4.1 Tools for Design of Programs
Design of programs is a vast field that is far beyond the scope of this class. In this class we'll learn one simple design technique known as "top-down stepwise refinement". You will learn some more complex techniques in other courses at Washburn.
For some reason design of programs is very difficult to teach. Some people have a natural knack for it and pick it up quickly. For others it can be an exercise in frustration. It is not uncommon for a seasoned programmer to be able to design complex algorithms in their heads without writing anything down. But ask them to explain the process to a somebody else and they have a difficult time. It's one of those things that's real easy once the light bulb goes off, but very difficult to explain to somebody else. Nevertheless, in this chapter we will do our best to explain the design process. With practice you will eventually be able to design simple programs in your head.
Most design techniques are based on the idea of breaking a problem into smaller parts so it is more manageable. Each smaller part can then be further broken down until each part consists of one simple programming step.
Often part of the design process is considering several different ways of solving a problem and comparing them for their efficiency and resource usage. The clear representation of the steps involved in each solution is crucial for this process. Thus understanding the material of the previous chapter is very important.
| Phase | Steps |
|---|---|
| Problem Analysis | 1. Define the problem as completely and clearly as possible. |
| 2. Eliminate all ambiguous words or decisions in the problem statement. | |
| 3. List the desired outputs. Prepare a sample of the output in the form it should appear. | |
| 4. List the necessary inputs. | |
| Algorithm Design | 5. Write down a 3 to 7 step solution in general terms using Warnier-Orr diagrams. |
| 6. Refine each of the steps in the previous solution into a sequence of 2 to 7 more detailed steps. | |
| 7. Repeat step 6 until sufficient detail is provided. | |
| Computer Implementation | 8. Test the design with structured walkthroughs. |
| 9. Convert the Warnier-Orr diagram of the algorithm into instructions for a specific computer language. The resulting product is called a program. | |
| 10. Test the program with carefully designed test data. Check for syntax and logic errors. |
4.3 Top-Down Stepwise Refinement Examples
In the rest of this chapter we'll go through several examples of solving simple problems using top-down stepwise refinement with Warnier-Orr diagrams.Sometimes real-world problems are used instead of real programming problems to illustrate the top-down stepwise refinement technique. In these examples it is difficult to know where to stop in terms of detail since they don't end in actual programming statements. They should be viewed as a pedagogical exercise to illustrate the technique. Real programming problems are much less ambiguous in terms of detail.
Example 1
As a first example consider the problem of hammering a nail into a piece of wood. Although this example is very simple, it does contain some of the problems that typically give students trouble. We'll talk about that as we go along.
The starting point is to write down a pseudocode statement that represents the whole problem. In this case it could be the following:
hammer a nailIf you think about it a little bit, you'll see that this process can be broken down into smaller steps. For example, to use the hammer you must first pick the hammer up. You must also hold the nail initially so that you can get it started. After it is started you don't need to hold it anymore. Note that starting the nail should also be a loop since you may have to hit the nail several times to get it to stay in the wood. This should be a post-test loop since you need to hit the nail at least once before you check to see if it's started. Then there's a loop where you hammer the nail over and over until it is flush with the wood surface. After the nail is flush you can put the hammer down.
Often the initial tasks are put into a single preparation step. Sometimes it is called "initialization". The steps at the end are also sometimes combined into one step. In this case we call it "finish up". Putting these ideas together we might come up with the following:
At the next level of detail we'll put in the various steps at the current level of detail.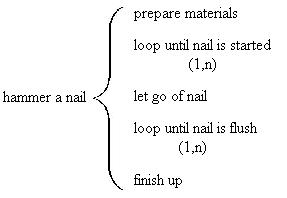
Note that there could be many variations on this theme. The act of hitting the nail with the hammer could be broken down into the steps of raising the hammer and lowering it onto the nail. In non-programming examples there is no way to tell how much detail to include. The value is simply to get you to think about how to represent familiar things in Warnier-Orr diagrams.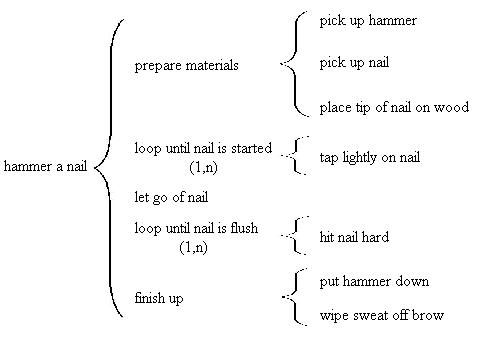
Before moving on, note the difference in this example between things that are done once (picking up hammer for instance) and things that are done in a loop (hitting nail with the hammer). Beginning students often include the one-time steps in the loops where they don't belong.
Example 2
Next consider a simple programming problem. If you're not familiar with programming variables you may want to come back to these examples once you've written some real C programs. Consider a program that asks the user for two numbers and then prints out the largest number. There is no problem if the numbers are the same, regardless of which one you print you will get the same answer.
We start with the name of the algorithm:
print largestNext we consider the substeps at the lowest level of detail. There is always some initialization required in programs (declaring variables for instance) and there is nearly always some output to print to the user. In this case there is also input. We could represent the second level of detail like this:
Next consider the variables we'll need. There are several ways to solve this problem. Perhaps the most straightforward is to have one variable for each number that we input. We'll do this. You could also have one variable and test it against each new number and only keep the largest one. Here's the next level of detail: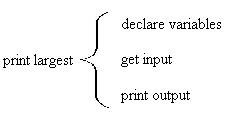
Note several things about this design. Before we read in a number we print a prompt to the user. This is so the user knows that the program is waiting for input. Otherwise the cursor just sits there and the user doesn't know what they're supposed to do. The prompt string can be something like "Enter a number".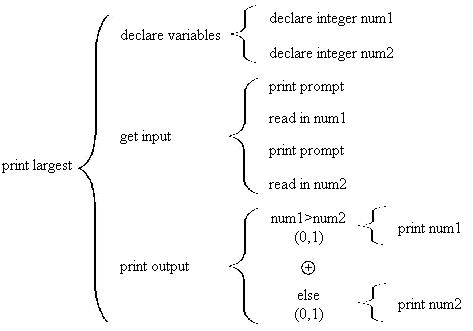
Also note that in this program the selection occurs within the output part of the program. It could also appear other parts of the program (if we checked the number when they typed it in it would appear in the input part of the program). There are lots of variations. In general you should find one that is easy to write and debug but avoid complicated and tricky solutions since these will be hard for future programmers to follow.
Example 3
The goal of this example is to write down an algorithm to compute the sum of the numbers from 1 to 10 and print out the result.
We start with a single pseudocode statement that represents the problem. In this case we could use the following:
sum numbers from 1 to 10There's also a At the next level of detail we need to consider several things. We need a loop to actually compute the sum. In loops there is often an initialization step to do things like setting the loop counter to 1 and the sum (accumulator) to 0. Many programmers prefer to do this as a separate step right before the loop since that part may be copied into another program as a single unit. If it is included with the program initialization it may be overlooked.
Our first refinement might look like this:
For the next refinement we put in the details for the current level of detail. It might look like this: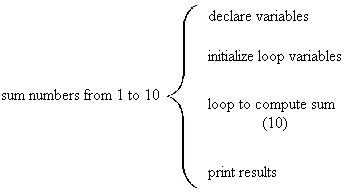
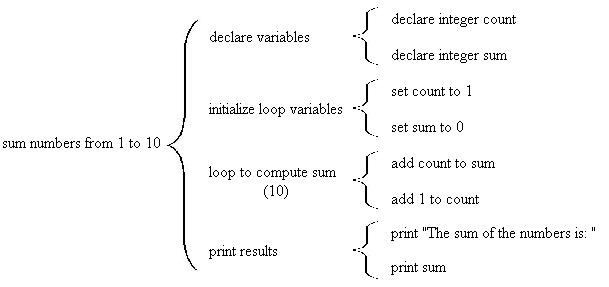
There are many ways to do this and your instructor may require you to use a method slightly different than the one shown here. In that case you should certainly do it the way they want you to.
We start with a column for each variable in the program. This program only uses two variables called "count" and "sum". In C language you should assume that when you declare a variable it contains garbage (that means it contains a pattern of 1's and 0's left over from whatever was running before your program started). AIX will actually set numeric variables to zero when it makes them, but many other systems don't. Thus we start our walkthrough with the following:
Now we consult the Warnier-Orr diagram and follow its steps. After the variables are declared we see that they are set in the step "initialize loop variables". We put a line through the existing values of the variables and underneath we write the new values. Thus we have:
count
garbagesum
garbage
Next we enter the loop and follow the steps in the loop 10 times (recall that (10) means it is finite repetition and will iterate 10 times). The first thing that happens is that the value of count is added to sum. This results in the following situation:
count
garbage
1sum
garbage
0
In the second step in the loop the count variable is incremented. The situation is now:
count
garbage
1
sum
garbage
0
1
The first step in the second iteration results in the following:
count
garbage
1
2sum
garbage
0
1
We continue along these lines until we reach the following situation:
count
garbage
1
2
sum
garbage
0
1
3
Thus the result of the program is the number 55. You should check this and make sure you agree that it is correct. As a programmer you will be responsible for the correctness of the programs you write. Always be suspect of other people's code and output.
count
garbage
1
2
3
4
5
6
7
8
9
10
11sum
garbage
0
1
3
6
10
15
21
28
36
45
55
Note that when doing a structured walkthrough it is very easy to make careless mistakes. If you do you usually have to start over. This can be very tedious and frustrating, but sometimes it is the only way to find logic errors.
One useful trick is to let the program do the walkthrough for you. You can do this by adding printf statements at various points in the program. There is more on this in the next chapter.
Example 4
In this example we'll consider a program that reads positive numbers from a user and calculates the sum of the numbers. The program continues until the user enters a number that is negative. That number is not included in the sum.
The initial step is to write a pseudocode name for the program:
add positive numbersIn the first refinement we consider the following steps. We need to declare all variables. We need to ask the user for a number. We need to check to see if the number is negative. If it is positive we need to add the number to the sum. We need to repeat the input until the user types in a negative number. Finally, we need to print the results.
Surprisingly, this kind of problem is usually done without any selection structures. Instead it uses pre-test repetition. The test at the top of the loop does the selection. However, we must read the number before we can test it, so the input stage is broken up into two parts. The first number is input before the loop and all subsequent numbers are input at the bottom of the loop.
You may find breaking up the input awkward, but it really does result in the simplest possible design. If you don't believe that, then try alternate ways of doing the design and see if you can come up with a more elegant solution. After we show the solution with pre-test repetition (by far the most common solution) we'll show the solution using post-test repetition with selection inside. This works fine but requires an additional programming structure.
Here's the second level of detail when using a pre-test loop.
Here's the second level of detail: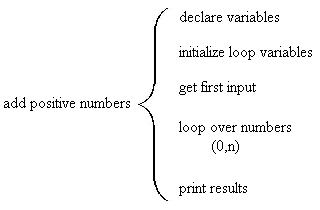
For contrast here's the same program using a post-test loop and selection. The selection is necessary to make sure the last number (negative) is not added to the sum.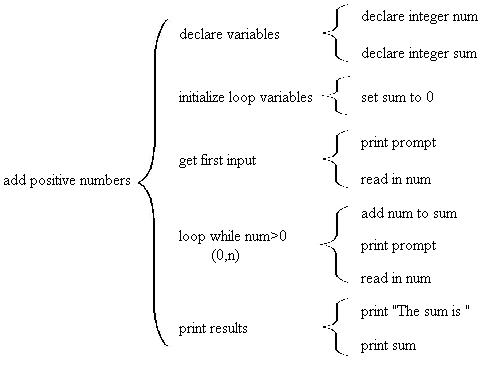
You should verify both of these designs with a structured walkthrough.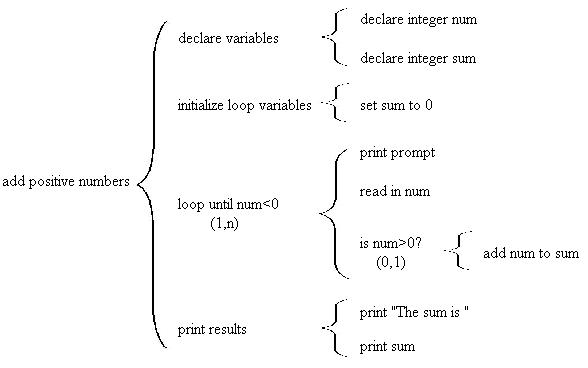
Example 5
This example is similar to many business programs. Our goal is to read a file of names and transaction amounts and compute the total of all transactions.
Unfortunately the details of reading files depend on the language you use. In some languages you can test to see if there are any more records in a file before you read from the file. In other languages you have to try to read from the file and then see if the read was successful. The second scenario is more common and will be used in this example. It most closely resembles what you will use later on in simple C programs.
As we saw in the previous example reading input can be done in a pre-test loop without using selection as long as the first record is read before the loop. Thus the part of the program that reads from the file would look something like this:
It should be emphasized that this form is only appropriate for a language where you have to try to read a record before you can test for the EOF. If you can test for the EOF without reading you would not read the first record before the loop. In that case the order of steps in the loop would also be reversed.
Next let's consider what the data file might look like. Customer names may appear as last and first names separated by a comma in a field of fixed width. The transaction amounts may appear after the names. Here's an example:
Smith,John                        21.66
Johnson,Barney                  -339.25
Halcove,Christina                889.26
       .                            .
       .                            .
       .                            .
Note at this point that in real business applications names are seldom used to
identify people. The reason is that names are not unique. Instead numbers are used
so that there is not a problem with uniqueness. We'll use names here because it
is simpler, but keep in mind that this is almost never done in real applications.
Now let's get back to the original problem. We want to read the transaction file and add up the transaction amounts of all transactions. We start with a name for the whole program. The following may suffice:
sum transactionsNext we add the second level of detail. Things to consider are declaring variables, reading all records in file and producing some output. We might end up with something that looks like the following:
Recall that "accumulator" is another name for "sum". At the next level of detail it may look like this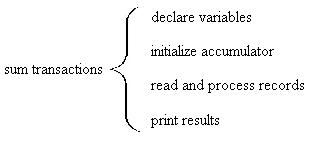
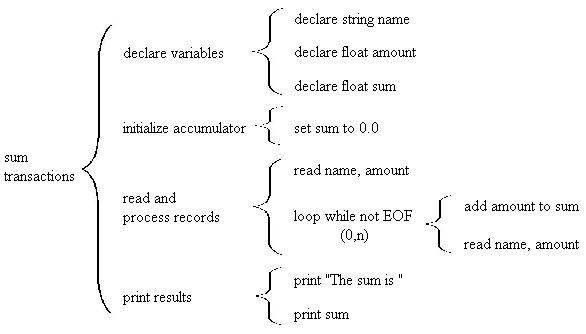
A common variation on this is to include the loop at the lowest level of detail as in the following diagram:
These two Warnier-Orr diagrams are completely equivalent. The only difference is that in the first one we include a single name for the file reading step which in not included in the second one. Which one to use is a matter of taste, although your instructor may have a strong preference, in which case you should do it the way they want you to.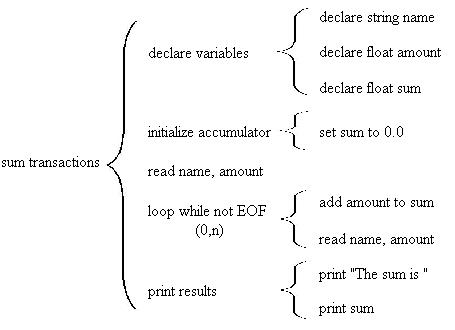
Example 6
The next example is a slight variation on example 5. In this case we assign account numbers to our accounts and have transactions that are specific to certain accounts. Let's suppose that there are 10 accounts numbered 01 through 10. The data file will contain the account number each transaction applies to as in the following:
Smith,John                      02        21.66
Johnson,Barney                  10      -339.25
Halcove,Christina               05       889.26
       .                         .          .
       .                         .          .
       .                         .          .
In this case we need to keep track of a sum for each account. This is most easily done
with an array. You will learn about arrays later in the class, for now just focus on
the Warnier-Orr diagram and how the new functionality can be incorporated into the previous
example.
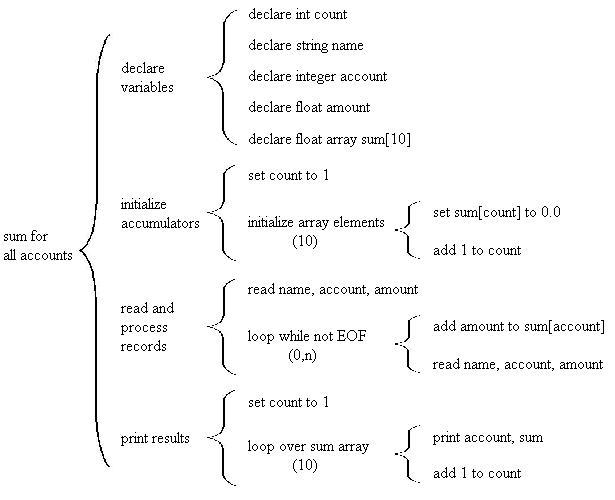
There are two major changes in the design. When iterating over the records we need to add the amount to the sum that matches the appropriate account. This is easy to do with arrays. All we need to do is use the account number as the array index. Another complexity is that we need to report a sum for each account. This will require another loop in the output part of the program.
Here's the final Warnier-Orr diagram for this program:
4.4 Questions
1. What is the difference between "top-down" and "bottom-up" design?2. Why is the Warnier-Orr diagram better suited for top-down stepwise refinement than flowcharts or ordinary pseudocode?
3. Why is it a good idea to put initialization of loop variables right before the loop they apply to rather than at the top of the program?
4. Give an example of how a structured walkthrough can help you find out if you forgot to initialize a counter or accumulator.
5. In many languages you have to try to read a file before you can test to see if you are at the end of the file. How does this affect the structure of a pre-test loop that is used to read a file?
